
Brows! Brows! Brows! Arched eyebrows, Shaped eyebrows, Bushy eyebrows, Groomed eyebrows... Eyebrows are one of our most expressive facial features and finding the right shape for your face can frame your eyes, add definition to your bone structure and make you instantly more attractive. Having a poor eyebrow shape can totally offset your beautiful features. You could have a perfect foundation routine, eyeshadow blending technique, awesome lipstick application but all of that would be worthless if your brows look like this:
 |
| "Nike" brows are a NO! NO! |
 |
| Bet y???? |
For a lot of fashionistas, these brows are obscene,sacrilege,disturbing and many more astonishing things. And if you decide to go without brows:
 |
| this is not right,lmao! |
 |
| Bushy Anne |

PRODUCTS USED
Tara Orekelewa eyepencil in Brown
Jordana eyepencil in Coffee Bean
Zaron eyebrow definer
Mary Kay concealer Bronze 2
Black opal stick foundation in Beautiful Bronze

Brushes
Angled brow brush
Angled concealer brush
Mascara wand (spoolie)

my starting brows

i draw a thin line under my brow using tara orekelewa brown eyepencil
starting at the side of the bridge of my nose extending and stopping
at the arch of my brow then i extend that line to the outer
corner of my brow.

Now i draw another thin line on top my eyebrow using the same pencil,
stopping at the arch then connecting with the line drawn under my brow

i fill in the space between the brow lines using the jordana eyepencil
making sure i shade lightly at the beginning of the brow

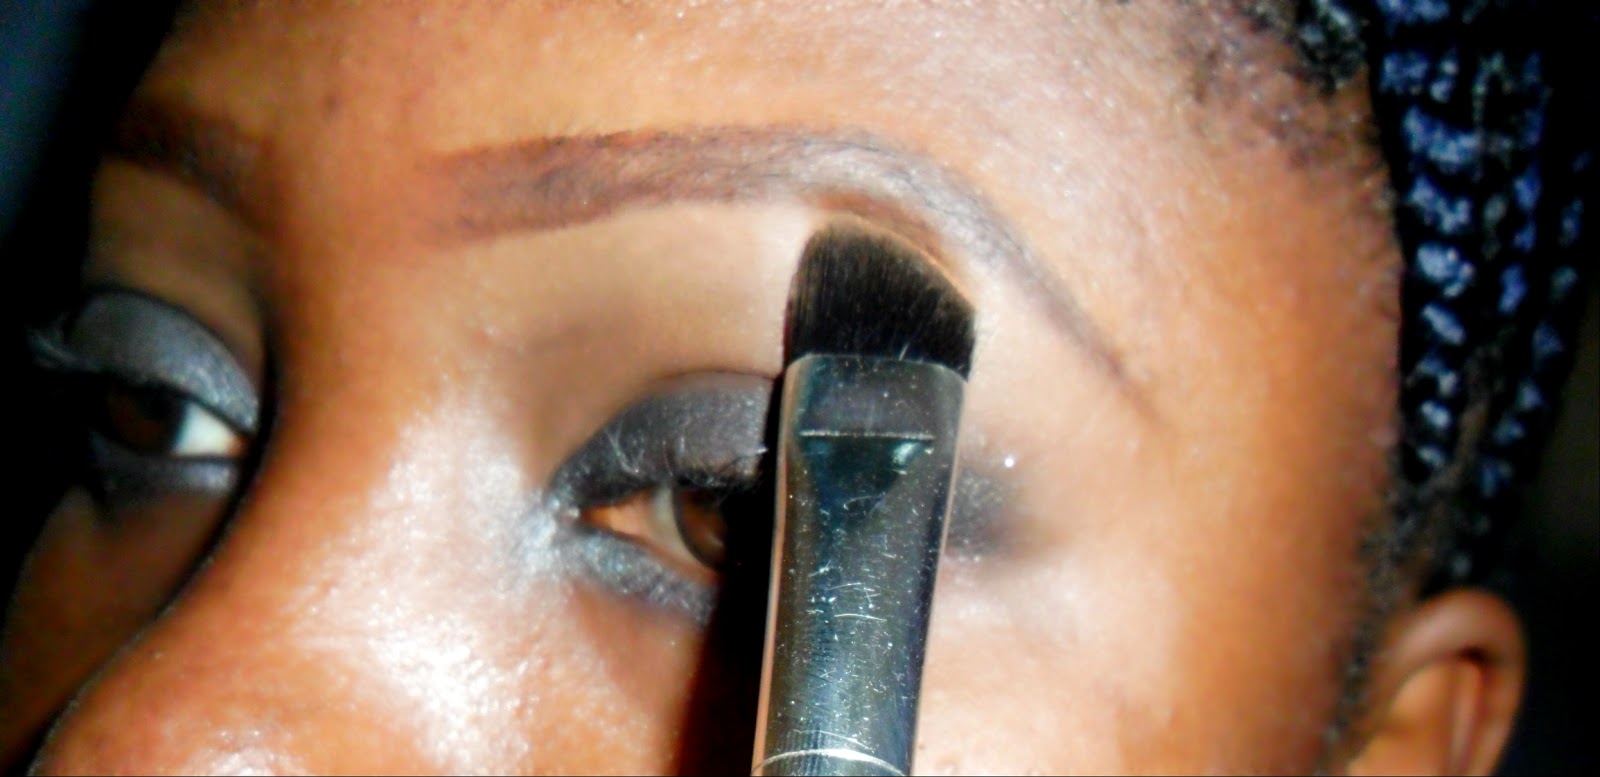
After dabbing my angled brow brush on mary kay concealer,
following my arch,i clean or conceal my brow bone area
to the outer corner of my eyes,i also clean the area at
the beginning of my brows

I use my finger to blend the concealer into my skin
to give a precise and clean look

Then i dab my brow brush on the black opal foundation which
is my skin tone shade,clean up the area above my brow
to give a defined arch.

I use my finger to blend the foundation into my skin

Then i use the angled brow brush in front of my brow
to shade that harsh edge,giving it an airbrushed effect
I use my angled concealer brush to apply powder to
the areas i used concealer and foundation on to
prevent creasing.

Tadaaaa!!! The Finished look!
So how do you fill your brows?
Ciao!!!
Choi nice work
ReplyDeletethank you dearie
DeleteTGIF!
ReplyDeleteBrows! Brows! Brows!....Tadaa!!!
Nice one @ Onajite dearie! U'r such a skilled tutor.I'm so not going browless anymore....Thanks make-up genuis!
my pleasure!!! *winks*
DeleteAwwww 9cely done n I jst learnt too!
ReplyDeleteAm glad 2 b of service!
DeleteYou've just saved a sista :)
ReplyDeleteam so glad to b of service
DeleteNice one. Thanks for the lessons.
ReplyDeleteyou are very welcome!
DeleteWow beautiful nice one
ReplyDeletetnks dearie
DeleteNice Tutorial
ReplyDeletethank you dearie
DeleteThat was educating
ReplyDeleteThanks! I used to use just concealer up and down the brows never knew that i needed to add my face powder and foundation. wow thanks a million!!!
ReplyDeleteThanks!!! Sure learnt a good lesson please more tutorials!
ReplyDelete